• Skip to primary navigation
  • Skip to main content
  • Skip to footer
Optimal Home Inspections

Optimal Home Inspections

Most Recommended Home Inspector in NJ

  • Home
  • My Qualifications
  • Services
  • Pricing
  • Resources
  • Book an Inspection
    • Buyers Inspection
    • Homeowners Inspection

Marshal

Spring Home Maintenance Checklist

June 15, 2022 by Marshal

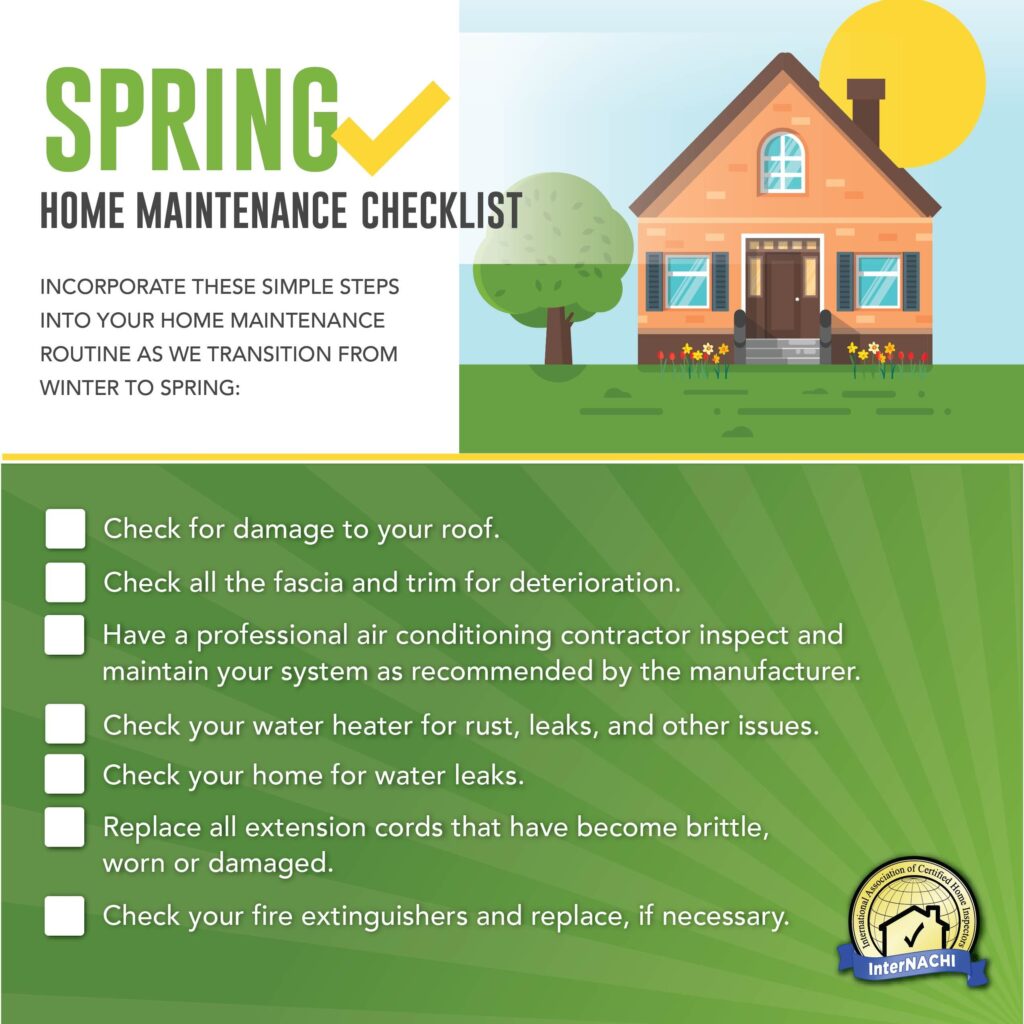
Incorporate these simple steps into your home maintenance routine as we transition from winter to spring.

Filed Under: FYI

Safety Barrier Guidelines for Residential Pools

June 4, 2022 by Marshal

Many communities have enacted safety regulations for barriers at residential swimming pools—in-ground and above ground. In addition to following these laws, parents who own pools can take their own precautions to reduce the chances of their youngsters accessing the family or neighbors’ pools or spas without supervision. This booklet provides tips for creating and maintaining effective barriers to pools and spas.

See the document here.

Filed Under: FYI

Preventing Water Intrusion

May 10, 2022 by Marshal

Preventing Water Intrusion in Basements & Crawlspaces

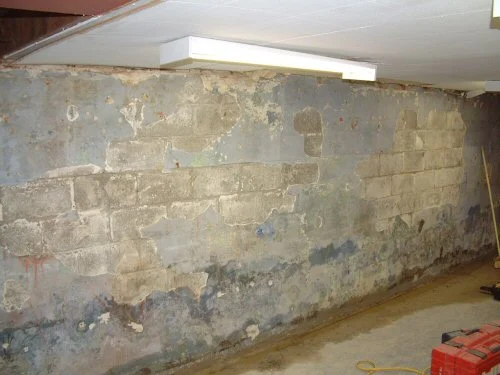
The biggest concern for homeowners related to their basement and/or crawlspace area is unwanted moisture intrusion.  This can be the result of several factors, which is why homeowners should occasionally check these areas.

The basement is typically the area of a home most at risk for water damage because it’s located below grade and surrounded by soil.  Soil releases the water it has absorbed during rain or when the snow melts, and the water can end up in the basement through cracks.  Water can even migrate through solid concrete walls via capillary action, which is a phenomenon whereby liquid spontaneously rises in a narrow space, such as a thin tube, or via porous materials.  Wet basements can cause problems that include peeling paint, toxic mold contamination, building rot, foundation collapse, and termite damage.  Even interior air quality can be affected if naturally occurring gases released by the soil are being transmitted into the basement. 

Properly waterproofing a basement will lessen the risk of damage caused by moisture or water.  Homeowners should be aware of what they can do to keep their basements and crawlspaces dry and safe from damage. 

Prevent water entry.
You can help prevent water from entering the basement by ensuring that it’s diverted away from the foundation.  Poor roof drainage and surface runoff due to gutter defects and improper site grading may be the most common causes of a wet basement. 

Here are some measures to use to divert water away from the foundation:

  • Install and maintain gutters and downspouts so that they route all rainwater and snowmelt at least 10 feet away from the foundation to prevent pooling near the exterior walls.  At the point where water leaves the downspout, it should be able to flow freely away from the foundation instead of back toward it, and it should not be collecting in standing puddles.  A backsplash and diverter can help with this.
  • The finish grade should be sloped away from the building for 10 to 15 feet.  Low spots that may lead to water pooling near the foundation should be re-graded and evened out.
  • Shallow ditches called swales should be dug if one or more sides of the home face an upward slope.  A swale should slope away from the home for 10 to 15 feet, at which point it can empty into another swale that directs water around to the downhill-side of the property, leading it away from the foundation.

Repair all cracks and holes.
There are several causes of cracks and holes that permit moisture intrusion.  Poor workmanship during the home’s construction is one factor.  Water pressure from the outside can also build up, forcing water through the walls.  The house may have settled, causing cracks in the floor or walls.  It’s important to repair all cracks and small holes to prevent leaks and floods.  Any large cracks or holes should be evaluated by a professional after consulting with your InterNACHI home inspector.

Here are some steps to take if you suspect that water is entering the basement through cracks or holes:

  • Examine the basement for holes and cracks and for moisture, leaks and discoloration.
  • A waterproof mixture of epoxy and latex cement can be used to fill small hairline cracks and holes. 
  • Any cracks larger than about 1/8-inch should be filled with mortar made from one part cement and two parts fine sand, with just enough water to make a fairly stiff mortar.  It should be pressed firmly into all parts of the larger cracks and holes to be sure that no air bubbles or pockets remain.  As long as water is not being forced through the basement walls due to outside pressure, the application of mortar with a standard trowel will be sufficient if special care is taken to fill all cracks completely.
  • If water is being forced through by outside pressure, a slightly different method of patching can be used, involving chiseling out the mouth the crack along its length and cutting a dovetail groove, which is then filled with mortar.  You may wish to defer this type of repair to a masonry professional.
  • Sodium silicate is a water-based mixture that will actually penetrate the substrate by up to 4 inches.  Concrete, concrete block and masonry include lime as a natural component, which reacts with the sodium silicate to produce a solid, crystalline structure that fills in all the microscopic cracks, holes and pores.  No water vapor or gas will be able to penetrate via capillary action because the concrete and masonry have now become harder and denser from the sodium silicate.  It is an alkaline substance and, as such, can burn the skin and eyes on contact.  Inhalation can also cause respiratory irritation.  All surfaces receiving this treatment must be prepared, and the several required applications must be thorough.  These are all reasons that this type of work should be performed by a trained professional.

Filed Under: FYI

Air-Conditioning Systems

May 6, 2022 by Marshal

A building’s central air-conditioning system must be periodically inspected and maintained in order to function properly. While an annual inspection performed by a trained professional is recommended, homeowners can do a lot of the work themselves by following the tips offered here.

Clean the Exterior Condenser Unit and Components

The exterior condenser unit is the large box located on the side of the house that’s designed to push heat from the indoors to the outdoors. Inside of the box are coils of pipe that are surrounded by thousands of thin metal “fins” that allow the coils more surface area to exchange heat. 

Follow these tips when cleaning the exterior condenser unit and its inner components — after turning off power to the unit, of course.

  • Remove any leaves, spider webs and other debris from the unit’s exterior. Trim foliage back several feet from the unit to ensure proper air flow.
  • Remove the cover grille to clean any debris from the unit’s interior. A garden hose can be helpful for this task.
  • Straighten any bent fins with a tool called a fin comb.
  • Add lubricating oil to the motor. Check your owner’s manual for specific instructions.
  • Clean the evaporator coil and condenser coil at least once a year. When they collect dirt, they may not function properly.

Inspect the Condensate Drain Line

Condensate drain lines collect condensed water and drain it away from the unit.  They’re located on the side of the inside fan unit. Sometimes there are two drain lines—a primary drain line that’s built into the unit, and a secondary drain line that can drain if the first line becomes blocked. 

Homeowners can inspect the drain line by using the following tips, which take very little time and require no specialized tools:

  • Inspect the drain line for obstructions, such as algae and debris. If the line becomes blocked, water will back up into the drain pan and overflow, potentially causing a safety hazard or water damage to your home.
  • Make sure the hoses are secured and fit properly.

Clean the Air Filter

Air filters remove pollen, dust, and other particles that would otherwise circulate indoors. Most filters are typically rectangular in shape and about 20 x 16 inches, and about 1 inch thick. They slide into the main ductwork near the inside fan unit. The filter should be periodically washed or replaced, depending on the manufacturer’s instructions. A dirty air filter will not only degrade the quality of the home indoors, but it will also strain the motor to work harder to move air through it, increasing energy costs and reducing energy efficiency. The filter should be replaced monthly during heavy use during the cooling seasons. You may need to change the filter more often if the air conditioner is in constant use, if any family members have respiratory problems if you have pets with fur, and/or if it’s particularly dusty indoors.  

Close the Air-Distribution Registers

Air-distribution registers are duct openings in ceilings, walls and floors where cold air enters the room. They should be closed after the cooling season ends in order to keep warm air from back-flowing out of the room during the warming season. Pests and dust will also be unable to enter the ducts during the winter if the registers are closed. These vents can typically be opened or closed with an adjacent lever or wheel.  Remember to open the registers in the spring before the cooling season starts.  Also, make sure they’re not blocked by drapes, carpeting or furniture.

In addition, homeowners should practice the following strategies in order to keep their central air-conditioning systems running properly:

  • Have the air-conditioning system inspected by a professional each year before the start of the cooling season.
  • Reduce stress on the air-conditioning system by enhancing your home’s energy efficiency. Switch from incandescent lights to compact fluorescents, for instance, which produce less heat.

Thermostats

Thermostats are devices designed to control the heating and cooling system in the home so that the air temperature remains comfortable. Homeowners should understand how thermostats operate, as well as the more common problems associated with them. 

Thermostats can be manually controlled or set to activate automatically based on timers or room temperature readings. Most thermostats contain two meters:  the “set” temperature that the thermostat is asking for, and the actual temperature. On a traditional dial-type thermostat, the user can increase the set temperature by rotating the dial clockwise, and lower it by rotating it counter-clockwise. Newer thermostats usually have digital displays, which can be used to adjust automated heating and cooling schedules. 

Location

In order to avoid false or “ghost” readings, which will cause unnecessary furnace or air-conditioner cycling, the thermostat must be installed so that it correctly reads the room temperature. 

The following locations may cause the thermostat to give false readings: 

  • near a heat source, such as a fireplace, hot water pipes, bright lights, direct sunlight, and electrical appliances that produce heat;  
  • in a drafty hallway, or near a window or exterior door that is left open often; and
  • on an outside wall. Outside walls are affected too much by outside temperatures, which may make the thermostat “think” the air in the house is warmer or cooler than it really is.

Common Thermostat Problems and Solutions

  • erratic operation or fluctuating temperature. This is often caused by poor pin connections between the thermostat and the backplate when the backplate is flexed against an uneven wall. To allow the backplate to flatten out, loosen the screws that attach the backplate to the wall, then snap the thermostat back onto the backplate. 
  • a thermostat that doesn’t respond to changes in room temperature. This can happen when there is air passing over the temperature sensor from a hole in the wall behind the thermostat, through which wires enter from the air-handling unit. To rectify this, insulate the hole behind the thermostat with fiber insulation, spray foam, or any other insulating material. 
  • a temperature reading that is inaccurate. A convenient way to test the temperature sensor is to tape a thermometer to the wall next to the thermostat and wait 15 minutes. A faulty thermometer needs to be recalibrated. Instructions for recalibration vary by manufacturer. 
  • loss of power. This may be caused by the following two situations:
    1. If the air handler powers the thermostat, check the circuit breaker meant for the air handler and make sure it has not tripped.
    2. If batteries power the thermostat, make sure they are lithium, not alkaline. Alkaline batteries will die rapidly or cause erratic thermostat operation.

Maintenance and Other Tips

  • Give the thermostat’s interior a light dusting with a small, soft-bristle paintbrush. Canned air can also be used to blow off dust. Twist the screws to remove the cover. Be sure to clean the contacts, which are small metal plates within the unit. The wires coming from the transformer attach to the contacts. Do not touch any of the interior parts with your fingers. 
  • If the base is loose, re-tighten the screws. Check the wires coming from the transformer. If any corrosion is present, remove the wire from the contact and clean it. Use a wire stripper to remove the surrounding insulation, cut back the wire, and reconnect it. 
  • Make sure the terminal screws are tight. 
  • For wireless thermostats, make sure the model number of the thermostat matches the model number of the receiver. If the model numbers don’t match, the thermostat and receiver will not be compatible and won’t function properly together. 
  • Make sure that your thermostat has been set to the proper position for the season: cooling or heating. The air conditioner will not run with the switch set to “heating” and, conversely, the heating system won’t run if the thermostat has been set to “cooling.”
  • Thermostats that contain a mercury switch must remain perfectly level or they may not control the temperature setting. 

A Few Notes on Energy Savings

  • Many people believe that furnaces work harder than normal to warm an area back up to a comfortable temperature, which will counteract energy savings gained from turning the thermostat down. This belief is a misconception that has been disproved by years of studies and research. Fuel is saved between the time the temperature is stabilized at the lower level and the next time heat is needed, while the fuel required to re-heat the space is roughly equal to the fuel saved while the building drops to a lower temperature. 
  • According to the U.S. Department of Energy, consumers can save 10% on their utility bills by setting their thermostat lower by 10° to 15° for eight hours. This can be easily accomplished with a programmable thermostat. 
  • Be careful not to set the thermostat so low in the winter that indoor plumbing pipes freeze, or so low during the summer that mold may be allowed to grow prompted by excess indoor humidity.  

Programmable Thermostats

Using a programmable thermostat in the winter, you can automatically turn down your heat at night or when you’re not at home.  In the summer, you can save money by automatically turning your air conditioner up at night or when you’re at work. 

Using a programmable thermostat, you can adjust the times that the heating and air conditioner go on and off according to a preset schedule. As a result, the equipment doesn’t operate as much when you’re asleep or when the house (or a part of it) is empty. Programmable thermostats can store and repeat multiple daily settings (six or more temperature settings a day) that you can manually override without affecting the rest of the daily or weekly program.

Filed Under: FYI, HVAC

Fireplaces

May 3, 2022 by Marshal

 When inspecting fireplaces and solid fuel burning appliances, a home inspector shall:

Inspect Fireplace

  • Fireplaces and solid fuel burning appliances, without testing draft characteristics, excluding fire screens and doors, seals and gaskets, automatic fuel feed devices, mantles and non-structural fireplace surrounds, combustion make-up air devices, or gravity fed and fan assisted heat distribution systems; and
  • Chimneys and combustion vents excluding interiors of flues and chimneys;

Describe Fireplace

  • Type of fireplaces and/or solid fuel burning appliances;
  • Energy source; and
  • Visible evidence of improper draft characteristics.

Filed Under: SOP Tagged With: Fireplace

Insulation

May 3, 2022 by Marshal

When inspecting the insulation components and ventilation system of a residential building, the home inspector shall:

Inspect Insulation

  • Insulation in unfinished spaces without disturbing insulation;
  • Ventilation of attics and crawlspaces; and
  • Mechanical ventilation systems; and

Describe Insulation

  • Insulation in unfinished spaces adjacent to heated areas; and
  • Evidence of inadequate attic and crawlspace ventilation.

Filed Under: SOP Tagged With: Insulation

Interior

May 3, 2022 by Marshal

When inspecting the interior of a residential building, a home inspector shall:

Inspect Interior

  • Walls, ceilings, and floors excluding paint, wallpaper and other finish treatments, carpeting, and other non-permanent floor coverings;
  • Steps, stairways, and railings;
  • Installed kitchen wall cabinets to determine if secure;
  • At least one interior passage door and operate one window per room excluding window treatments; and
  • Household appliances limited to:
    • The kitchen range and oven to determine operation of burners or heating elements excluding microwave ovens and the operation of self-cleaning cycles and appliance timers and thermostats;
    • Dishwasher to determine water supply and drainage; and
    • Garbage disposer.

Filed Under: SOP Tagged With: Interior

Heating

May 3, 2022 by Marshal

When inspecting the heating system, a home inspector shall:

Inspect Heating

  • Installed heating equipment and energy sources, without determining heat supply adequacy or distribution balance, and without operating automatic safety controls or operating heat pumps when weather conditions or other circumstances may cause damage to the pumps, and excluding humidifiers, electronic air filters and solar heating systems;
  • Combustion vent systems and chimneys, excluding interiors of flues or chimneys;
  • Fuel storage tanks, excluding propane and underground storage tanks; and
  • Visible and accessible portions of the heat exchanger.

Describe Heating

  • Heating equipment and distribution type; and
  • Energy sources.

Filed Under: SOP Tagged With: Heating

Electrical

May 3, 2022 by Marshal

When inspecting the electrical system, a home inspector shall:

Inspect Electrical

  • Service entrance system;
  • Main disconnects, main panel, and sub panels, including interior components of the main panel and sub panels;
  • Service grounding;
  • Wiring, without measuring amperage, voltage or impedance, excluding any wiring not a part of the primary electrical power distribution system, such as central vacuum systems, remote control devices, telephone or cable system wiring, intercom systems, security systems, and low voltage wiring systems;
  • Over-current protection devices and the compatibility of their ampacity with that of the connected wiring;
  • At least one of each interior installed lighting fixture, switch, and receptacle per room and at least one exterior installed lighting fixture, switch, and receptacle per side of the house; and
  • Ground fault circuit interrupters.

Describe Electrical

  • Amperage and voltage rating of the service;
  • Location of the main disconnect, main panels, and sub-panels;
  • Type of over-current protection devices;
  • The predominant type of wiring;
  • Presence of knob and tube branch circuit wiring; and
  • Presence of solid conductor aluminum branch circuit wiring.

Filed Under: SOP Tagged With: Electrical

Landscaping

May 3, 2022 by Marshal

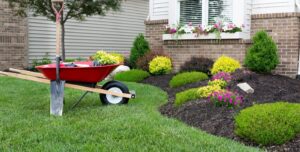
Well-maintained landscaping and other improvements are important for the enjoyment of a healthy and durable property.

Plants, Trees & Shrubs:  Check the location and condition of all trees and shrubbery. Those that are overgrown should be pruned or trimmed. Where trees or bushes have overgrown, complete removal may be necessary. Trees need to be trimmed.  Overhanging branches should not interfere with a chimney’s draft, be too close to utility wires, or deposit leaves and twigs on the roof or inside gutters and drains. Trees and shrubbery that are very close to exterior walls or roofs can cause damage. They can make it difficult to perform homeowner maintenance, inspections and repairs. Branches around the perimeter of the house should be pruned back. Tree roots under concrete walks can cause damage. Roots are usually exposed near the surface and can be cut back. Tree roots can cause a home’s foundation to crack by pushing against it from the outside. If you have any of these issues, consider hiring an arborist. An arborist is a specialist in the cultivation and care of trees and shrubs, including tree surgery, the diagnosis, treatment, and prevention of tree diseases, and the control of pests. Find a certified arborist in New Jersey at www.njaisa.com

Filed Under: FYI, Lot

  • « Go to Previous Page
  • Page 1
  • Page 2
  • Page 3
  • Page 4
  • Page 5
  • Interim pages omitted …
  • Page 10
  • Go to Next Page »

Footer

Optimal Home Inspections LLC

Call 551-261-1264

Optimal Home Inspections
2600 John F Kennedy Blvd
Jersey City, NJ 07306
North Jersey - Hudson County
(551) 261-1264

101 Dunhams Corner Rd
East Brunswick, NJ 08816
Central Jersey - Middlesex County
(551) 261-1264

Follow us

  • facebook
  • instagram
  • linkedin
  • threads
  • x

Licenses

NJ Home Inspector License Number: 24GI00176700

Certified Radon Measurement Technician: MET13906

Termite Inspector – Commercial Pesticide Applicator License Number: 61282B

Lead-Safe Certified Firm NAT-F238931-1

Associations

American Society of Home Inspectors (ASHI)
Garden State Chapter American Society of Home Inspectors
International Association of Certified Home Inspectors (InterNACHI)
NJ International Association of Certified Home Inspectors

Our Service Area

I inspect homes in Bergin, Essex, Hudson, Middlesex, Monmouth, Morris, Passaic, Somerset, and Union Counties. I inspect anywhere in New Jersey, but the counties listed here are where I work most.

Opening Hours

Monday 8 AM – 9 PM
Tuesday 8 AM – 9 PM
Wednesday 8 AM – 9 PM
Thursday 8 AM – 9 PM
Friday 8 AM – 9 PM
Saturday 8 AM – 9 PM
Sunday 8 AM – 9 PM

Copyright © 2026 · Optimal Home Inspections LLC · Log in

  • Home
  • Book an Inspection
  • Services
  • Pricing
  • Standards
  • Resources
  • Reports